Ever typed out the perfect text message but realized it’s too late at night to send it? Or maybe you’re worried something important to forget will slip your mind tomorrow morning? You’re not alone—millions of iPhone users face this daily dilemma.
The good news? Apple finally added native text scheduling to iOS, and it’s easier than you think. Whether you need to send birthday reminders, schedule business messages during work hours, or set up appointment reminders, this complete guide shows you exactly how to schedule text messages on iPhone using the latest iOS 18 features and proven workarounds for older versions.
By the end of this guide, you’ll master the Send Later feature, learn the Shortcuts app automation method, and discover how to troubleshoot every common issue. Let’s dive in!
Table of Contents
Can You Schedule Texts on iPhone?
Yes! You can now schedule text messages on iPhone using multiple methods depending on your iOS version.
Apple introduced the built-in scheduler with iOS 18, making message scheduling incredibly simple. This native text scheduling feature works directly in the Messages app and requires no third-party apps or complicated workarounds.
What You Need to Know Before Starting:
For iOS 18 Users:
- ✅ Native Send Later feature built into Messages
- ✅ Works with iMessage (blue bubble conversations)
- ✅ Schedule up to 14 days into the future
- ✅ Offline sending capability
- ✅ Encrypted storage on Apple servers
For iOS 13-17 Users:
- ⚠️ Requires Shortcuts app automation workaround
- ⚠️ More setup steps but fully functional
- ✅ Can schedule beyond the 14-day limit
Critical Limitation: The native scheduler only works with iMessage (blue bubbles). You cannot schedule SMS messages to Android users or non-iMessage contacts (green bubble conversations) using Apple’s built-in feature. For those, you’ll need third-party apps like Scheduled or Text Delay app.
iMessage vs SMS: Understanding the Difference
| Feature | iMessage (Blue Bubble) | SMS (Green Bubble) |
|---|---|---|
| iOS 18 Send Later | ✅ Works | ❌ Not supported |
| Shortcuts Automation | ✅ Works | ⚠️ Limited support |
| Internet Required | Yes (Wi-Fi or cellular data) | No (cellular signal only) |
| Encryption | End-to-end encrypted | Not encrypted |
| Recipient | iPhone, iPad, Mac users | Any phone (Android included) |
Now let’s explore exactly how to schedule texts using each method.
iOS 18 Native Method: Using Send Later Feature
This is the easiest and most reliable way to schedule a text message on iPhone. Apple’s iOS 18 scheduling feature integrates directly into the Messages app, making text scheduling iOS seamless and intuitive.
Prerequisites
Before you set up scheduled text messages, ensure:
- Your iPhone runs iOS 18 or later (check Settings > General > Software Update)
- You’re sending to an iMessage contact (blue bubble)
- You have an active internet connection (for initial setup)
Step-by-Step: How to Schedule a Text on iPhone (iOS 18)
Step 1: Open Messages App and Start a Conversation
Launch the Messages app on your iPhone. Either:
- Select an existing conversation, or
- Tap the compose button (✏️) in the top-right to start a new message
Step 2: Access the Send Later Feature
Instead of typing your message first, tap the plus (+) icon to the left of the text field. You’ll see a menu with options—select “Send Later”.
💡 Pro Tip: The interface changes when Send Later is active. You’ll notice the text field border becomes a dashed line indicator, showing you’re in scheduling mode.
Step 3: Choose Your Send Time
Tap the blue send button area at the top of your message. This opens the scheduler interface where you can:
- Select preset times (later today, tonight, tomorrow morning)
- Tap the time/date to manually create scheduled message for any specific moment
- Schedule up to 14 days into the future
The scheduler interface is intuitive—use the wheel picker to select hours and minutes, then swipe to choose your date.
Step 4: Type Your Message
Now type your text message as you normally would. The dashed line around the text field reminds you this is a scheduled message, not an immediate send.
Step 5: Confirm and Schedule
Press and hold send button (the arrow icon), then tap Send to confirm your delayed text iPhone scheduling.
Your message now appears in the conversation with:
- A dashed outline (instead of solid)
- A clock icon ⏰
- The scheduled send time displayed above it
The message will send message later automatically—even if your iPhone is turned off or you’re offline! Apple handles this through encrypted storage on their servers temporarily until delivery.
Understanding the Dashed Line Indicator
The dashed line indicator is your visual cue:
- Dashed border = Message is scheduled but not sent yet
- Solid border = Message has been delivered
- Clock icon = Shows when the message will send
Send Later Limitations You Should Know
While iOS 18 Send Later is powerful, it has restrictions:
- 14-Day Maximum: You can only schedule iMessage up to 14 days ahead
- iMessage Only: Doesn’t work for SMS to Android users
- Internet Dependent: Your device needs internet at scheduling time (but not at send time)
- No Recurring: Each message is one-time; you cannot set recurring messages natively
- Timezone Aware: Messages send based on your current timezone setting
Tips for Maximum Success
✅ Double-check recipients before scheduling—there’s no “Are you sure?” confirmation
✅ Schedule group messages the same way—all recipients get the message simultaneously
✅ Use for birthday reminders—set them weeks in advance so you never miss one
✅ Schedule business messages during appropriate work hours (9 AM – 5 PM typically)
✅ Avoid overnight scheduling unless you know the recipient has Do Not Disturb enabled
Shortcuts App Method (iOS 13-17)
If you’re using an older iOS version (13 through 17), don’t worry—you can still schedule text messages iPhone using the Shortcuts app. This iOS 13-17 workaround requires more setup but offers unique advantages, including the ability to schedule SMS and create recurring messages.
What is Shortcuts App Automation?
The Shortcuts app comes preinstalled on iPhones running iOS 13 or later. If you can’t find it, download it free from the App Store. Personal automation within Shortcuts lets you trigger actions—like sending texts—at specific times.
Prerequisites for Shortcuts Method
- iPhone with iOS 13 or newer
- Shortcuts app installed
- 5-10 minutes for initial setup
- Basic understanding of Time of Day automation
Step-by-Step: Schedule Texts with Shortcuts App
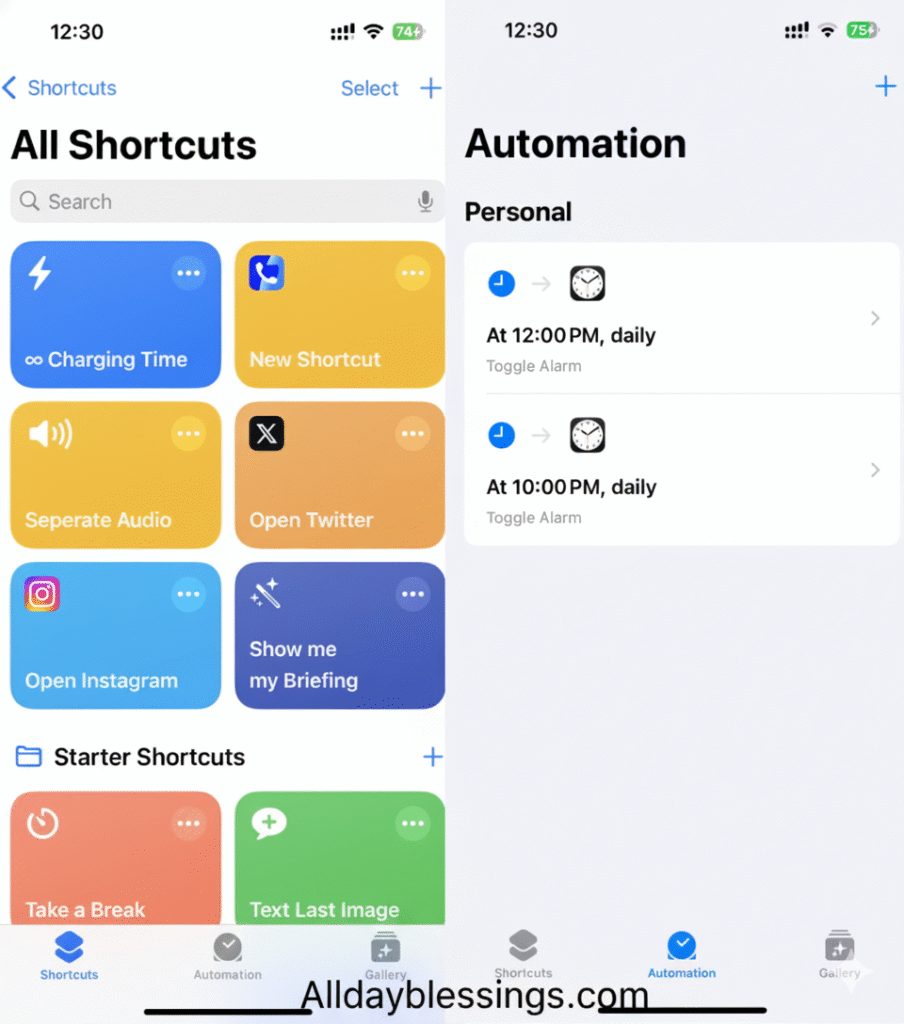
Step 1: Open Shortcuts and Navigate to Automation
Launch the Shortcuts app from your home screen. At the bottom, you’ll see several tabs—tap Automation.
If this is your first automation:
- Tap “Create Personal Automation”
If you’ve created automations before:
- Tap the + icon in the top-right corner
- Select “Create Personal Automation”
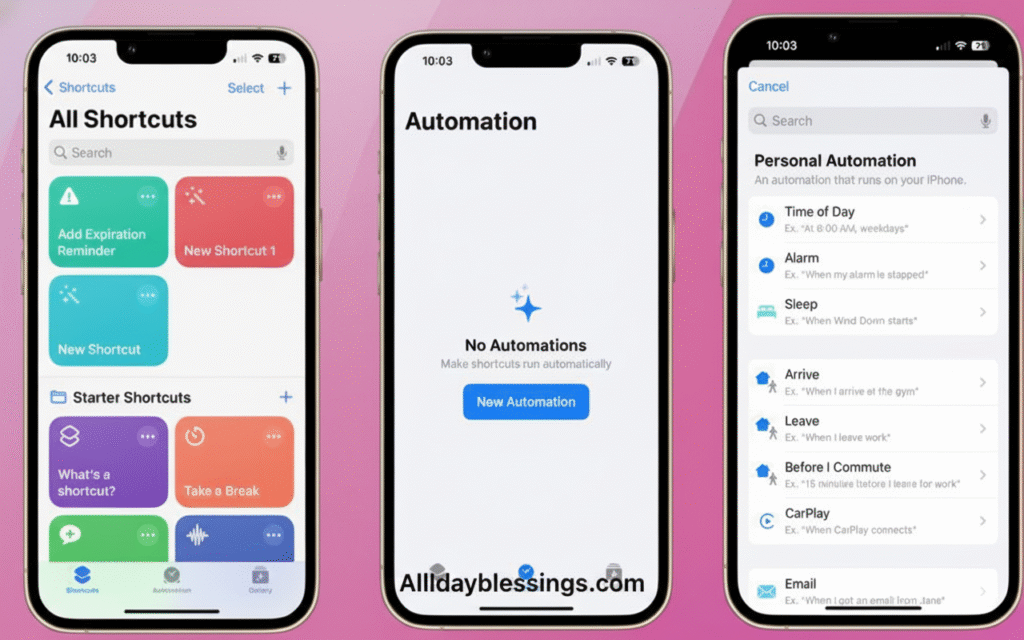
Step 2: Choose Time of Day Trigger
Scroll through the trigger options and select “Time of Day”. This determines when your scheduled message will send.
Step 3: Set Your Schedule
Configure when you want to automate text sending:
Time: Set the exact hour and minute Repeat: Choose frequency:
- Daily for messages that send every day
- Weekly for specific days (Monday, Wednesday, etc.)
- Monthly for monthly reminders
Date (for Monthly): Select which day of the month
💡 One-Time Message Hack: Select “Monthly” and choose a date that only occurs once. Remember to delete the automation after it runs!
Tap Next when configured.
Step 4: Add Send Message Action
Now you’ll define what happens at your scheduled time:
- Tap “Add Action”
- In the search bar, type “Send Message“
- Select the Send Message action
Step 5: Compose Your Message
You’ll see two fields:
Message Field:
- Tap “Message” and type your full text
- This can be as long as you need
- Include emojis, links, whatever you want
Recipients Field:
- Tap “Recipients”
- Select contacts from your address book
- You can choose multiple recipients for group messages
Step 6: Configure Ask Before Running
This is critical! You’ll see a toggle called “Ask Before Running”:
Enabled (Default): Your iPhone will show a notification at the scheduled time asking you to confirm sending. You must tap to approve.
Disabled: The message sends automatically without any input from you. Perfect for truly automated text sending!
Choose based on your needs, then tap Next.
Step 7: Review and Activate
Review your automation summary:
- ✓ Trigger time is correct
- ✓ Message content is accurate
- ✓ Recipients are right
- ✓ Ask Before Running setting matches your preference
Tap Done to activate your Shortcuts app automation.
Managing One-Time vs Recurring Messages

For One-Time Messages: After your message sends, you must manually delete scheduled message automation:
- Open Shortcuts app
- Go to Automation tab
- Swipe left on your automation
- Tap Delete
Otherwise, it will send again at the next scheduled interval!
For Recurring Messages: Perfect for:
- Daily medication reminders
- Weekly team meeting notifications
- Monthly bill payment reminders
- Regular check-ins with family
Just leave the automation active—it will send text later automatically on your chosen schedule.
Shortcuts Method Advantages Over iOS 18
✅ No 14-day limit—schedule months or years ahead
✅ Recurring messages possible
✅ Works on older iOS (13-17)
✅ More customization options
✅ Can integrate with other Shortcuts actions
Shortcuts Method Disadvantages
❌ More complex setup process
❌ Requires manual deletion for one-time sends
❌ Less visual feedback than native method
❌ “Ask Before Running” can be annoying if left on
Managing Your Scheduled Messages
Whether you used iOS 18 Send Later or Shortcuts automation, you’ll eventually need to edit scheduled text, reschedule message, or cancel scheduled text. Here’s how to manage everything.
Editing Scheduled Messages (iOS 18)
Changed your mind about what you wrote? You can edit scheduled text before it sends:
- Open the Messages app
- Navigate to the conversation with your scheduled message
- Scroll down if needed—scheduled messages may appear below sent ones
- Tap and hold the scheduled message bubble (with dashed outline)
- Select “Edit” from the popup menu
- Make your changes
- Tap the checkmark (✓) to save edits
Your message maintains its original send time but updates with your new content.
Rescheduling Messages (iOS 18)
Need to change when your message sends?
Method 1: Quick Reschedule
- Open Messages and find your scheduled message
- Tap “Edit” next to the scheduled date (above the message)
- Select “Edit Time”
- Choose a new date and time
- Tap outside the scheduler to save
Method 2: Send Immediately
- Tap “Edit” next to the scheduled date
- Select “Send Message”
- Message sends right away
This is perfect when you realize, “Actually, I should send this now!”
Deleting Scheduled Messages (iOS 18)
To cancel scheduled text completely:
- Open Messages
- Locate your scheduled message
- Touch and hold the message bubble
- Tap “Delete”
The message is cancelled and won’t be delivered. Your recipient never sees it—there’s no trace.
⚠️ Important: Once deleted, you cannot recover the message. Make sure you’re certain before deleting!
Managing Shortcuts Automations
For Shortcuts app scheduled messages:
To Edit:
- Open Shortcuts app
- Go to Automation tab
- Tap the automation you want to change
- Modify time, message, or recipients
- Tap Done
To Delete:
- Open Shortcuts app
- Automation tab
- Swipe left on the automation
- Tap Delete
To Temporarily Disable:
- Tap the automation
- Toggle the switch at the top to OFF
- Re-enable later when needed
Comparing All iPhone Text Scheduling Methods
Here’s a comprehensive comparison to help you choose the best text scheduling iOS method for your needs:
Method Comparison Table
| Feature | iOS 18 Send Later | Shortcuts App | Third-Party Apps |
|---|---|---|---|
| iOS Requirement | 18+ | 13+ | Varies (usually 12+) |
| Ease of Setup | ⭐⭐⭐⭐⭐ Very Easy | ⭐⭐⭐ Moderate | ⭐⭐⭐⭐ Easy |
| iMessage Support | ✅ Yes | ✅ Yes | ✅ Yes |
| SMS Support | ❌ No | ⚠️ Limited | ✅ Yes (most apps) |
| Schedule Limit | 14 days | Unlimited | Varies |
| Recurring Messages | ❌ No | ✅ Yes | ✅ Yes |
| Offline Sending | ✅ Yes | ⚠️ Phone must be on | Varies |
| Cost | Free | Free | Free/Paid |
| Privacy | Excellent (Apple encrypted) | Good | Varies by app |
| Edit After Scheduling | ✅ Easy | ⚠️ Moderate | ✅ Usually yes |
| Group Messages | ✅ Yes | ✅ Yes | ✅ Yes |
When to Use Each Method
Use iOS 18 Send Later When:
- You have iOS 18 or newer
- Sending to iMessage contacts only
- Need messages within 14 days
- Want the simplest, fastest method
- Value privacy and encryption
Use Shortcuts App When:
- You have iOS 13-17
- Need recurring daily/weekly messages
- Want to schedule beyond 14 days
- Comfortable with technical setup
- Need integration with other automations
Use Third-Party Apps When:
- You must schedule SMS to Android users
- Need advanced features (templates, bulk sending)
- Want professional business messaging tools
- Require analytics or delivery tracking
- Need to schedule beyond Apple’s limitations
Popular Third-Party Apps for SMS Scheduling
If you need to schedule SMS to Android users, consider:
- Scheduled App (Free with in-app purchases)
- Simple interface
- SMS and iMessage support
- Recurring messages
- Message templates
- Text Delay App (Paid)
- Professional features
- Bulk scheduling
- Contact groups
- Delivery reports
- Remind (Free)
- Basic scheduling
- Notification-based (manual send)
- No actual auto-sending
Remember: Third-party apps require permission to access your messages and contacts. Always review privacy policies before granting access.
Troubleshooting Common Issues
Even with perfect setup, you might encounter problems. Here’s how to troubleshoot scheduled message issues and resolve failed scheduled text situations.
Issue 1: Scheduled Message Didn’t Send
Symptoms: Message shows as scheduled but never delivered.
Solutions:
✅ Check Internet Connection: For iMessage scheduling, you need internet at scheduling time (but not send time). If your connection dropped during setup, the message might not have been queued properly.
✅ Verify iMessage is Active: Go to Settings > Messages > Confirm iMessage toggle is ON (green).
✅ Confirm Recipient Uses iMessage: Messages to Android users or green bubble contacts won’t work with native text scheduling.
✅ Check iOS Version: Ensure you’re actually on iOS 18+. Go to Settings > General > About > Software Version.
✅ Restart Messages App: Force close Messages (swipe up from bottom, swipe away Messages) and reopen.
Issue 2: “Message Didn’t Send” Error
Symptoms: You see a red exclamation mark and “Not Delivered” error.
Solutions:
✅ Tap “Try Again”: The simplest fix—tap the error and select “Send Again.”
✅ Send as Text Message: If it’s actually an SMS issue, hold the message and choose “Send as Text Message.”
✅ Check Recipient Status: If their device is offline, delivery may be delayed. This is normal.
✅ Verify Phone Number/Email: Ensure you have the correct contact information for the recipient.
Issue 3: Can’t Find Send Later Option
Symptoms: The + icon doesn’t show “Send Later.”
Solutions:
✅ Update to iOS 18: This feature doesn’t exist on earlier versions. Update via Settings > General > Software Update.
✅ Check Message Type: Only works in blue bubble (iMessage) conversations. Green bubble SMS won’t show this option.
✅ Restart iPhone: Sometimes a simple restart resolves UI glitches. Hold power button and slide to restart.
✅ Reset Messages App: Settings > Messages > Toggle iMessage OFF, wait 30 seconds, toggle ON.
Issue 4: Shortcuts Automation Not Firing
Symptoms: Your Time of Day automation doesn’t send the message at the scheduled time.
Solutions:
✅ Verify “Ask Before Running” is OFF: If enabled, you must manually confirm. Disable for true automation.
✅ Check iPhone is Powered On: Unlike iOS 18’s offline sending, Shortcuts requires your device to be active.
✅ Enable Background Refresh: Settings > General > Background App Refresh > Ensure it’s ON for Shortcuts.
✅ Review Automation Settings: Open Shortcuts > Automation > Tap your automation > Verify time/date are correct.
✅ Test Immediately: Change the time to 1 minute from now to test if it’s working at all.
Issue 5: Message Sent to Wrong Contact
Symptoms: Scheduled message delivered to unintended recipient.
Prevention:
✅ Double-Check Recipient Before Scheduling: Take an extra second to verify the contact name at the top of the conversation.
✅ Use Contact Photos: Settings > Messages > Show Contact Photos helps you visually confirm recipients.
✅ Avoid Similar Names: Be extra careful with contacts who share names (two “Johns” in your contacts).
⚠️ No Undo After Send: Once a message delivers, you cannot recall it. Double-checking is critical!
Issue 6: Scheduled Message Shows But Doesn’t Edit
Symptoms: Tapping scheduled message doesn’t allow editing.
Solutions:
✅ Hold, Don’t Tap: You must touch and hold the message bubble, not just tap it.
✅ Look for Correct Menu: Ensure you see “Edit” in the popup menu. If not, try holding longer.
✅ Check Timing: If the send time is within 1 minute, editing may be locked to prevent conflicts.
✅ Delete and Reschedule: As a last resort, delete scheduled message and create a new one.
Issue 7: Cellular Signal Required Error
Symptoms: Message fails to send, cites cellular signal required.
Explanation: This typically affects SMS messages, not iMessage. Internet connection required for iMessage; cellular signal required for SMS.
Solutions:
✅ Enable Wi-Fi Calling: Settings > Phone > Wi-Fi Calling > ON. This allows SMS over Wi-Fi.
✅ Switch to iMessage: If the recipient has an iPhone, ensure you’re using iMessage (blue bubble) instead of SMS.
✅ Wait for Signal: If you’re in a low-signal area, the message will send automatically once signal returns.
Quick Troubleshooting Checklist
When something goes wrong, run through this quick check:
- [ ] iOS 18 or later installed?
- [ ] iMessage is enabled?
- [ ] Recipient uses iMessage (blue bubble)?
- [ ] Internet connection active?
- [ ] Scheduled time hasn’t passed?
- [ ] Message properly saved (dashed outline visible)?
- [ ] Correct contact selected?
- [ ] iPhone not in Low Power Mode (can delay automations)?
Advanced Tips & Use Cases
Now that you know how to schedule texts, let’s explore creative ways to use text scheduling iPhone features to save time and never miss important messages.
Business and Professional Use Cases
1. Appointment Reminders Schedule appointment reminders 24 hours before meetings:
- “Hi [Name], reminder about our 2 PM meeting tomorrow. See you then!”
- Reduces no-shows by 40% according to business studies
- Schedule during business hours (9 AM-5 PM) for professional courtesy
2. Work Hours Boundaries Think of something after-hours but don’t want to message immediately? Schedule for next work day morning:
- Prevents “always on” work culture burnout
- Respects colleague’s personal time
- Appears punctual and organized
3. Follow-Up Messages After networking events, schedule follow-ups for 2-3 days later:
- “Great meeting you at [event]. Let’s connect on that project idea.”
- Timing is perfect—not too eager, not forgotten
- Consistent follow-through builds professional reputation
4. Client Communications Schedule business messages for optimal response times:
- Monday 10 AM for highest open rates
- Avoid Friday afternoons
- Respect time zones if working with international clients
Personal Life Optimization
5. Birthday Reminders Never Miss Schedule birthday reminders weeks in advance:
- Set for 9 AM on the birthday
- Add personal message beyond generic “Happy Birthday”
- Schedule follow-up “How was your day?” message for evening
6. Medication and Health Reminders Use Shortcuts recurring messages for daily health routines:
- “Take your vitamin D supplement!”
- Morning medication reminders
- Evening routine check-ins
7. Family Check-Ins Schedule weekly messages to distant family:
- Sunday evening “How was your week?” messages
- Maintains connection without forgetting
- Creates consistent communication patterns
8. Event Countdowns Build excitement for upcoming events:
- “Only 7 days until our trip!”
- “3 days until concert—getting excited!”
- Scheduled countdowns maintain enthusiasm
Time Zone Management
When scheduling messages across time zones:
- Set Your Reference: Messages send based on YOUR current timezone
- Calculate Carefully: If it’s 3 PM your time and you want them to receive at 10 AM their time (3 hours ahead), schedule for 7 AM your time
- Use World Clock: iPhone Clock app > World Clock to track recipient’s time
- Double-Check: One wrong calculation sends a message at 3 AM their time!
Relationship Maintenance Strategies
The “Thinking of You” System: Schedule monthly check-ins with friends you want to stay close to:
- First Monday each month: Schedule 3-4 friend messages
- Personalize each with recent memory or inside joke
- Builds relationship depth without overwhelming yourself
The “Never Forget” Safety Net: For crucial dates (anniversaries, important meetings):
- Schedule TWO reminders: one week before and day-of
- First message: “Excited for [event] next week!”
- Second message: Day-of greeting/confirmation
Content Creator Applications
Social Media Coordination: While this isn’t direct social posting, coordinate with team members:
- “Post about [topic] going live in 30 minutes!”
- Scheduled reminders before Instagram Lives or YouTube premieres
- Team synchronization for coordinated launches
Safety and Emergency Uses
Safety Check-Ins: When traveling alone:
- Schedule messages to trusted contact: “Made it to hotel safely”
- If message sends without your cancellation, they know to check on you
- Set for expected arrival time + 30 minutes
Medication Compliance: For family members who need reminders:
- Daily medication check-in messages
- Scheduled at exact medication times
- Can include dosage information
Frequently Asked Questions
Can you schedule texts to Android users?
No, the iOS 18 Send Later feature only works with iMessage (blue bubble). For Android compatibility, you need third-party apps like Scheduled or Text Delay app.
Do scheduled texts require internet connection?
For iMessage: Internet required to initially schedule (Wi-Fi or cellular data), but messages send even if you’re offline afterward. For SMS: Cellular signal required at send time.
Can you schedule group messages?
Yes! Schedule group messages the same way as individual texts using Send Later feature. All recipients receive the message simultaneously at scheduled time.
What’s the maximum time you can schedule ahead?
iOS 18 native: 14 days maximum. Shortcuts app: No limit—schedule months or years ahead. Third-party apps: Varies by app, typically 30-365 days.
Will recipients know my message was scheduled?
No. Recipients see scheduled messages exactly like normal texts. There’s no indication it was sent via delayed text iPhone feature.
Can you schedule recurring messages?
iOS 18 native: No, only one-time messages. Shortcuts app: Yes, supports daily/weekly/monthly recurring messages. Third-party apps: Most support recurring schedules.
What happens if I turn off my iPhone?
iOS 18 Send Later: Messages still send via Apple servers—offline sending works perfectly. Shortcuts automation: Won’t fire if phone is off; requires device to be powered on.
Can you schedule messages in different time zones?
Yes, but messages send based on YOUR current timezone. Calculate the time difference carefully to ensure recipient receives at intended local time.
Do scheduled messages use cellular data?
iMessage uses data (minimal, ~1-5 KB per message). SMS uses cellular network, not data. Scheduling itself uses negligible data for the initial setup.
Can you schedule SMS and iMessage differently?
No mixing—native scheduling is iMessage-only. Use third-party apps if you need to schedule SMS to non-iPhone users.
How do you cancel a scheduled message?
Touch and hold the scheduled message (dashed outline), tap Delete. For Shortcuts automation, open Shortcuts app, swipe left on automation, tap Delete.
Are scheduled messages encrypted?
Yes. iOS 18 scheduling uses encrypted storage on Apple servers until send time. Messages maintain end-to-end encryption like regular iMessages.
Conclusion
Mastering how to schedule text messages on iPhone is a game-changer for staying organized, maintaining relationships, and never forgetting important communications. Whether you’re using the sleek iOS 18 Send Later feature for quick scheduling or the powerful Shortcuts app automation for advanced recurring messages, you now have the complete toolkit.
Key Takeaways:
✅ iOS 18 users: Use the native Send Later feature for effortless iMessage scheduling up to 14 days ahead
✅ iOS 13-17 users: Leverage Shortcuts app for unlimited scheduling and recurring messages
✅ SMS needs: Explore third-party apps for Android compatibility and green bubble messaging
✅ Always verify: Double-check recipient, timing, and message content before scheduling
✅ Manage actively: Regularly review, edit scheduled text, and delete scheduled message automations you no longer need
Start small—schedule just one birthday reminder or appointment reminder this week. As you get comfortable, you’ll discover countless ways text scheduling iOS simplifies your daily life.
Ready to never forget another important message? Open your Messages app right now and create scheduled message for something you’ve been meaning to send. Your future self will thank you!
Have questions about scheduling texts on iPhone? Drop a comment below, and we’ll help troubleshoot any issues you’re facing with iPhone text scheduling!
Found this guide helpful? Share it with friends who could benefit from mastering the Send Later feature and never missing important messages again.

I’m Watson, a faith-inspired writer passionate about sharing heartfelt blessings and uplifting words that bring peace, gratitude, and hope. Through my daily blessings, I aim to comfort the soul and inspire spiritual growth.